Mini Electric / Cooper SE Warning Lights and Dash Symbols
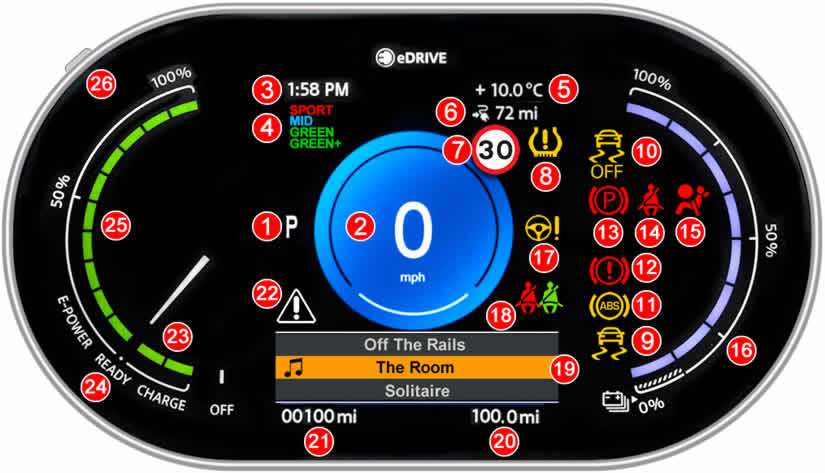
Detailed here is an explanation of the various dashboard symbols and gauges of the Mini Electric’s 5.5 inch digital display. The Mini electric, also known as the Mini Cooper SE has been in production since 2019 and is a fully electric version of the popular small car. Along with the various dashboard symbols and gauges, we’ll also explain what the Mini electric warning lights mean, along with what action to take.
 Gear Selector Lever
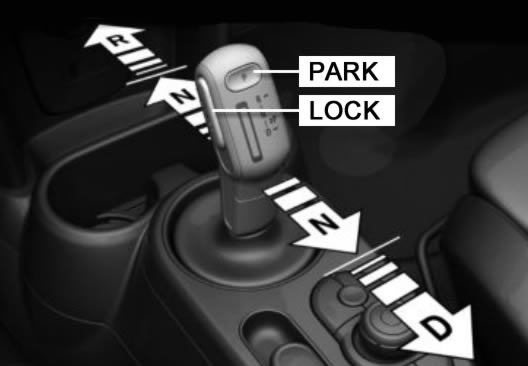
The options on the Mini Electric gear selector lever are as follows:
- D: Drive. This is the normal position for driving the vehicle.
- R: Reverse. Only select reverse when the vehicle is stationary.
- N: Neutral. Neutral should be selected if the vehicle requires to be pushed, or if used in certain car washes that require neutral.
- P: Park. Only select Park when the vehicle is stationary. Once the Mini electric is in Park, the drive wheels will be locked.
- Shift Lock: Shift lock prevents the accidental shifting into Drive (D), Neutral (N), or Reverse (R).

 Vehicle Speed
This displays the Mini Electric’s current speed, either in MPH or KM/H.
 Current Time
This displays the Mini Electric’s current time.
 Driving Modes
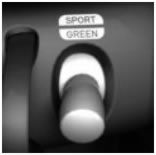
The Mini Electric’s driving modes allows you to choose between four different programs. The four modes; Mid, Green, Green+ and Sport can be selected by the driving modes switch in the centre column.

Flick the switch either up or down until you see your selected driving mode displayed on the dashboard instrument display. The Mini Electric’s four available driving modes are as follows:
Mid
The Mid driving mode provides a balanced option between performance and green.
Green
The Green driving mode provides consumption saving tuning to help increase vehicle range.
Green+
The Green+ driving mode maximises vehicle range at a cost of comfort features such as A/C that may be reduced or deactivated.
Sport
The Sport driving mode increases vehicle responsiveness in certain areas for greater driving agility.
 External Temperature
This function displays the external outside temperature. It can be configured either in Fahrenheit (℉) or Celsius (℃). If the external temperature indicator drops to +37 ℉/+3 ℃, a warning sound along with a Check Control message will alert the driver that there’s an increased risk of ice on the roads.
 Vehicle Range
This function displays the calculated current range of your Mini electric, either in miles or kilometres. If the range is not displayed and only lines can be seen, this means the vehicle’s battery is heavily discharged. In this instance, heating and climate control functions will be deactivated and during this state, an exact range cannot be calculated or displayed onscreen.
 Speed Limit
The Mini Electric speed limit information system uses a camera located behind the rear view mirror to detect traffic signs, either at the edge of the road or on overhead sign posts to display the current maximum speed limit on the dashboard display. Extra symbols such as wet road conditions may also display if detected by the vehicle’s rain sensors. Speed limit information can also be displayed in the head-up-display.
If the speed limit information system is not working as expected, ensure the windscreen is clean and clear of fog so that the camera has a clear view of the road ahead. If you are seeing a box that does not contain speed limits but rather dashed lines, it means the speed limit with navigation system is currently unavailable.
 Tyre Pressure
The Mini Electric tyre pressure warning light comes on when the tyre pressure monitoring system (TPMS) detects a loss of pressure in one or more tyres. If the tyre pressure light flashes, then remains on, it means a fault has been detected in the system.
A flashing tyre pressure warning light is often due to a sensor in one of the tyres not being installed or damaged. Damage can often occur during a tyre change. It may also result from a reset procedure not correctly being carried out.
Resetting the Tyre Pressure System
You may want to reset the tyre pressure system after altering tyre pressures or changing tyres. Before resetting the tyre pressure system, always make sure that each tyre is inflated to the recommended cold pressures (see what are cold tyre pressures for more information). Recommended cold tyre pressures can be found on a label inside the driver’s door. To reset the Mini Electric tyre pressure system:
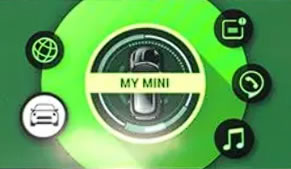
- Using the central information display, select ‘My Mini‘.

Select the ‘My Mini’ option on the central information display - Then select the option ‘Vehicle status‘.
- Now select ‘Tyre Pressure Monitor‘
 .
. - Switch on drive-ready state, but do not drive off.
- Reset tyre inflation pressure: ‘Perform reset‘.
- You’ll now receive the message: Resetting tyre pressure monitor.
Now drive away and after several minutes of driving, the new tyre pressure values will be accepted as the pressure reference values and the tyre pressure system will have reset.
 DSC
DSC
The Mini Electric DSC stands for Dynamic Stability Control and is responsible for maintaining vehicle stability by reducing understeer, oversteer and increasing wheel traction. When DSC is active, the warning light will flash. This means that you’re driving close to the vehicle’s limits and should slow down. If the DSC warning light remains always on, it means there’s a fault with the system. The fault is usually a result of a damaged wheel speed sensor.
 DSC OFF
If you have manually switched on the Dynamic Stability Control system (DSC), the DSC OFF warning light will illuminate. It’s almost always better to leave DSC on, but if your Mini is stuck in mud or snow, switching off DSC may help.
 ABS
ABS
All new cars, including the Mini Electric have ABS. ABS stands for Anti-lock Braking System and helps to prevent the wheels from locking during heavy braking. This in turn allows the driver to continue to steer. If the yellow ABS light remains on, it means there’s a fault. If ABS is non-functional, the Mini Electric’s normal braking system will remain unaffected. As with DSC, the usual cause for an ABS fault is due to a faulty wheel speed sensor.
 Brake System
The red circle containing an exclamation mark is the brake warning light. The brake warning light may come on as an indication of low brake fluid or due to a fault with the Mini Electric’s braking system. If the brake light comes on, it’s advised that you stop driving and contact a Mini workshop.
 Parking Brake
The red circle containing the letter P means that the parking brake has been set. The Mini Electric has automatic release; press the accelerator pedal and the parking brake will automatically release and the warning light will go off.
 Front Seat Belt
The red seat belt warning light is on or flashes when the driver or front passenger seat belts are not fastened.
 Airbag
The Mini electric contains a front driver and passenger airbag, head airbag, side airbags and knee airbag along with seat belt pretensioners. If the airbag warning light remains lit, it may indicate a fault with any of these functions. Have the airbag system services as soon as possible.
 Battery Charge Indicator
When the vehicle’s standby state and drive-ready state are switched on, the fill level bars on the right-side of the Mini Electric’s dashboard display indicate the current charge of the battery.
 Power Steering
This warning light remains illuminated when there’s a problem with the power steering. You may notice that the steering wheel is more difficult to turn than normal. This can sometimes be a temporary fault where the electric motor has overheated and has temporarily been deactivated.
 Rear Seat Belt
The red rear seat belt warning light illuminates when the corresponding seat belt is not fastened. The green rear seat belt warning light illuminates when the corresponding seat belt is fastened.
 Vehicle Data and Information
This section on the Mini Electric’s dashboard displays various information and vehicle data such as:
- Average consumption.
- Average speed.
- Charge state of the high-voltage battery.

- Date.
- Distance to destination. (When destination guidance is activated
in the navigation system). - Time of arrival. (When destination guidance is activated
in the navigation system). - Trip odometer.
- Multimedia information.
- Warning messages (Check Control).
You can call up various information by repeatedly pressing the button on the end of the indicator turn signal lever.
 Trip Odometer
The trip odometer can be used to measure distances. This displays the distance travelled since the last trip reset. To reset the trip odometer, press the button at the top-left of the display ![]() .
.
 Odometer
Displays the total mileage that the vehicle has driven.
 Check Control Message
The triangle containing an exclamation mark means that at least one check control message is displayed or stored and available to read. Check control message may be warning texts that may alert you of a problem or fault, or a maintenance message, such as when the vehicle is due a service. To read available check control messages:
- Using the central information display, select ‘My Mini‘.

Select the ‘My Mini’ option on the central information display - Then select the option ‘Vehicle status‘.
- Then enter the ‘Check Control‘ option
 .
.
 Regenerative Braking
This section of the Mini Electric’s dashboard indicates regenerative braking levels. When you come off the accelerator, the Electric Mini enters regenerative braking and puts energy back into the battery. When the pointer goes into this section, when both LEDs are illuminated yellow, it indicates high energy recovery, when one LED is illuminate in yellow, it indicates low energy recovery.
 Drive Ready State
When the pointer is in the ‘Ready’ section, it means that the Mini Electric is in drive-ready state, meaning that the car is ready to drive. This is the equivalent to a normal car with the engine started. Deactivating drive-ready state is equivalent to switching off the engine and on the Mini Electric, switching off drive-ready will help to conserve energy.
 Drive Efficiency
This section indicates how efficient your driving is in terms of acceleration. The harder you accelerate, the more bars light up, indicating a greater use of energy.
